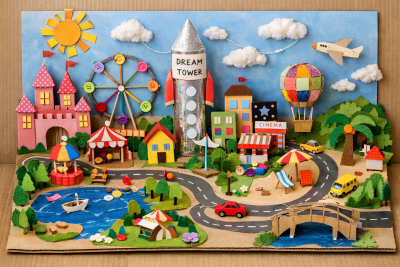
Design Your Dream City
The Creative Way to Build Your Own World (Ages 8–12)
Sometimes a city is not just a place where one lives.
Sometimes a city is a reflection of a child's dreams, ideas, and hopes.
Sky gondolas gliding between skyscrapers, colorful roads, houses that shine with light… Today we present you with a creative activity that you can both design and produce with children: Your Dream City / The House of the Future 🏙️✨
🌈 Why Do We Recommend This Activity?
This project helps children turn their imagination into a tangible product.
The theme-based production process deepens their thinking skills while also providing space for them to express themselves freely.
Through this activity, children:
- Develop their imagination
- Strengthen their fine motor skills
- Learn to plan and design
- Gain self-confidence
- Have the opportunity to express their own ideas
🧰 Required Materials
- Cardboard / poster board
- Colored pencils or acrylic paint
- String
- Buttons
- Glue
- Scissors
- Optional colorful papers and fabric scraps
🧠 Before You Start…
Determine a theme that will inspire the participants:
- “What would your dream city look like?”
- “If you were to design the house of the future, how would you do it?”
Then encourage everyone to freely design their own dream.
The important thing here is to create space for each child's idea and support their creativity.
🏗️ Step-by-Step Construction
1. Ground Preparation and Planning
Cardboard is used as the ground of the city.
First, the locations of the roads, buildings, and other areas are planned.
👉 This stage develops thinking and organizational skills.
2. Creating Buildings
Various structures are prepared using cardboard pieces of different sizes:
- House 🏠
- Skyscraper 🏢
- School 🏫
- Park 🌳
👉 Thus, the building design process begins.
3. Painting and Adding Characters
The prepared buildings and roads are painted:
- Colorful houses
- Gray roads
- Blue sky
👉 Colors give identity and vibrancy to the city.
4. Adding Details with Strings
Different details can be added to the city using strings:
- Gondola lines
- Electrical lines
- Hanging gardens
👉 This stage adds movement and depth to the design.
5. Decorating with Buttons
Buttons can be used creatively for various purposes:
- Windows
- Street lamps
- Traffic lights
- Flowers
👉 Small details make a big difference.
🏷️ Name Your City
Give a name to the city that emerges together. For example:
- Colorful Future City
- Dream Town
- City of Lights
🎭 Expand the Activity
To make the activity even more fun, you can try these ideas:
- Tell the story of the city together
- Create a character for each building
- Prepare a mini model city exhibition
- Take a family city tour and explore while narrating the city
💛 Small But Important Notes
- Each child's dream is different
- Be supportive instead of intervening
- Originality is important, not perfection
- Enjoy the process together rather than focusing on the outcome
🌿 Final Words
Building a city is not just about constructing buildings.
In fact, it is about shaping a thought, a dream, and a future.
As children design their own cities, they do not just engage in an activity; they also reveal their inner worlds.
Continue to rebuild with love.